


Table of Contents
Recording acoustic guitar at home can be fun and rewarding but equally frustrating. I’ve spent 20+ years perfecting my technique, and I’m excited to share what I’ve learned with you.

The best way to record acoustic guitar at home is in a soundproofed room with a condenser microphone positioned near the 12th fret of the guitar.
This setup captures a balanced sound of both the body and the strings. I like using cardioid pattern mics as they focus on the guitar and reduce background noise.
But you don’t need expensive gear to get started. A simple USB mic and your computer can produce good results.
As you improve, you might want to invest in better equipment. But for now, let’s focus on technique. With the right approach, even basic tools can create professional-sounding recordings.
Preparing your recording space
Setting up your space right makes a big difference. It affects how your guitar sounds on the recording, so let’s look at the key things to think about.

Choosing the right room
I’ve found that picking the right room is crucial. A medium-sized room often works best. It shouldn’t be too big or too small.
Avoid rooms with lots of hard surfaces, like kitchens or bathrooms. They can make the sound bounce around too much.
Look for a room with items that can help absorb sound.
- Carpet or rugs
- Soft furnishings like sofas or curtains
- Bookshelves
My spare bedroom works great. It’s quiet and has soft surfaces that help absorb the sound.
Minimising unwanted noise
Keeping noise out is key for clear recordings. Here are some tips I use:
- Turn off noisy appliances like fridges or air cons
- Close windows to block outside sounds
- Choose a quiet chair or stool. You don’t want rogue squeaks cutting through your mix
- Put a “Recording in Progress” sign on the door (if you have noisy flatmates or small children)
- Use weather stripping on doors to seal gaps
I also time my recordings for when it’s quietest. Early mornings or late evenings often work well.
Understanding room acoustics
Room acoustics affect how your guitar sounds. Hard surfaces create echoes and reverb, while soft surfaces absorb sound. You want a balance.
Too much reverb can make your recording sound muddy. Too little can make it sound flat and lifeless.
Listen to how your guitar sounds in different spots in the room. Move around until you find the sweet spot where it sounds best.
Acoustic treatment basics
Acoustic treatment can dramatically improve your sound. You don’t need expensive gear to start. Here are some simple tips:
- Hang heavy curtains or blankets on walls
- Put bookshelves against bare walls
- Place a rug on hard floors
I made my own panels with rock wool slabs encased in plastic (to prevent the fibreglass from escaping). They work great and are cheap to make.
I have tried foam panels but found they were only helpful at absorbing bass frequencies. Rock wool is a more effective ‘broad band’ solution that can also work on higher frequencies.
Remember, the goal is to control reflections, not kill all the sound. A bit of natural room sound can add life to your recording.
Essential recording equipment
You’ll need some key gear to capture great acoustic guitar sounds at home. Let’s look at the most important pieces of equipment for getting started.
Choosing a microphone
A good microphone is crucial for recording acoustic guitars. I recommend using condenser microphones. They’re sensitive and can pick up the subtle nuances of an acoustic guitar.
These are my recommended microphones for recording acoustic guitar
- The Audio-Technica AT-2020 is durable and delivers clear, detailed audio without excessive colouration. While the XLR version requires an audio interface, the microphone’s overall value and performance make it a reliable option for beginners and more experienced users looking for professional-grade sound on a budget.
- The Aston Spirit is considered one of the best multipurpose condenser microphones around. Built in the UK, it combines a high-quality capsule with carefully selected electronics, resulting in a microphone that delivers clean, natural sound with just a touch of high-end enhancement.
- While it’s not the cheapest option, the Shure SM81 is a top choice for a higher budget. The transparent sound makes it a staple for recording acoustic guitars, delivering clear and accurate tones.
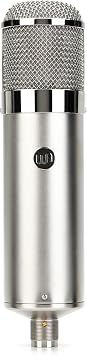
- The Warm Audio WA-47 is a modern recreation of a classic tube mic and is ideal for capturing the warmth and character of acoustic guitar. The tube-driven circuitry adds a rich, vintage-inspired tone, making it perfect for professional studios and musicians aiming for a lush, full-bodied sound.
- The Neumann U87 is a legendary microphone often found in top-tier studios. Known for its exceptional clarity and adaptability, the U87 delivers pristine audio with a balanced frequency response, making it an excellent choice for capturing the natural dynamics and harmonics of an acoustic guitar.
 |  |  |  |  |
Our Rating: 4.1 | Our Rating: 4.5 | Our Rating: 3.5 | Our Rating: 3.5 | Our Rating: 3.5 |
$119.00 | N/A | £942.53 | £381.00 | N/A |
Importance of a quality audio interface
An audio interface connects your mic to your computer. It’s essential for getting clean, clear recordings.
Look for an interface with:
- At least one mic preamp
- 48V phantom power for condenser mics
- A hi-Z input for plugging in electric guitars
- Headphone output
A few good interfaces to consider
- The Focusrite Scarlett series is a great entry interface for getting started. It’s compact, delivers professional-grade audio, and the setup is incredibly straightforward.
- Designed by Solid State Logic, a company renowned for its high-end studio consoles, the SSL 12 combines top-notch preamps with a clean, transparent sound. Its multiple input and output options make it versatile for both solo artists and small bands.
- Inspired by classic studio designs, the Heritage i73 offers pristine audio quality with a warm, analogue character. Known for its superior build and high-quality components, it’s perfect for musicians and engineers looking for a professional-grade interface with vintage-style tonal flexibility.
Make sure your interface is compatible with your computer and recording software. Most modern interfaces connect via USB, making them easy to set up.
Great for Solo Musicians  |  |  |
Our Rating: 4.1 | Our Rating: 3.5 | Our Rating: 3.5 |
$599.00 | $399.99 | $224.99 |
Additional gear: stands, cables, and headphones
Don’t overlook these essentials:
- Mic stand: A sturdy stand keeps your mic in place. Get one with a boom arm for easier positioning.
- Cables: Invest in good quality XLR cables. Cheap cables can introduce noise into your recordings.
- Headphones: Closed-back headphones are best for recording. They prevent sound from bleeding into your mic. I like the Beyerdynamic DT 100 headset for its rugged, no-frills design and excellent sound isolation.
- A pop filter can be helpful too. It reduces plosive sounds when recording vocals or close-miked guitar.
Remember, you don’t need the most expensive gear to get started. Focus on the basics and upgrade as you learn and grow.
Choosing the right guitar
Different guitar types offer unique tonal characteristics. Let’s explore some common types and how they can influence your recorded sound.
Acoustic guitar types

Parlour guitars are smaller in size, making them ideal for fingerpicking styles.
They produce a focused, mid-range tone that can be perfect for intricate melodies and soft, nuanced playing.
Their compact size also makes them easier to handle, especially for players with smaller hands.

OO and OOO guitars are slightly larger than parlour guitars but still smaller than dreadnoughts.
They offer a balanced tone with a bit more volume and bass response compared to parlour guitars.
These models are versatile, suitable for both fingerpicking and light strumming, and they often feature in folk and blues recordings.

Dreadnought guitars are known for their large bodies and big, bold sound.
They provide a strong bass response and high volume, making them popular for indie and rock styles where a powerful rhythm guitar is needed.
Their robust sound can dominate a mix, providing a solid foundation for other instruments.

Jumbo guitars are even larger than dreadnoughts and deliver a very full, resonant sound.
They excel in genres that require a lot of projection and sustain, such as country and rock.
The larger body size enhances low-end frequencies, giving a rich, booming tone that can fill out a recording.

Baritone guitars are tuned lower than standard guitars and can add depth and a distinctive character.
They can add a unique harmony to existing guitar tracks and provide a useful alternative to a bass guitar. This lower voicing creates a symphony of tones, enriching the overall texture of your recordings.

Classical or nylon-string guitars offer a warm, mellow tone with a softer attack than steel-string guitars.
Ideal for classical, flamenco, and Latin music, they bring a gentle, expressive quality to recordings. These guitars are perfect for intricate fingerstyle playing, adding a unique, intimate texture to a mix.
When recording, careful mic placement is crucial to capture the subtle nuances and dynamic range of a nylon string guitar, ensuring that the natural warmth and resonance are fully expressed in the mix.
Impact of guitar sizes on recorded sound
The size and shape of a guitar significantly impact its tonal qualities and how it records.
- Smaller guitars like parlours and OO models tend to have a more focused sound with less bass, which can be ideal for solo acoustic tracks or where clarity and detail are paramount. They tend to suit players who prefer finger picking.
- Larger guitars like dreadnoughts and jumbos provide more volume and bass response, which can add depth and richness to a recording. These guitars are preferred by players who play chords more.
Using two different guitar sizes for double tracking can create a lush, layered sound.
For example, recording a rhythm part with a dreadnought and a lead or harmony part with a parlour guitar can add depth and dimension to your mix.
Practical Considerations
Travelling with your guitar
If you’re a travelling musician, the size of your guitar can be an important factor.
Smaller guitars, like parlours and OO models, are easier to transport and may fit into overhead compartments on planes.
However, a larger guitar might be preferable for its richer sound if you’re primarily recording at home.
Choosing based on your style
Your musical style should guide your guitar choice.
Fingerstyle players might prefer the articulate sound of a parlour or OO guitar, while strummers and rhythm players might prefer the robust sound of a dreadnought or jumbo.
Setting up your gear

Getting your equipment ready is key for a great take. The right setup can make all the difference in capturing crisp, clear sound.
Monitoring and controlling latency
Latency is the delay between playing a note and hearing it through your speakers or headphones. Too much latency can throw off your timing.
To keep latency low:
- Use direct monitoring if your interface has it
- Lower your buffer size in your recording software
- Use ASIO drivers on Windows for better performance
Signal chain configuration
Your signal chain is the path your guitar’s sound takes from string to speaker. Getting it right is key for a clean recording.
Here’s a typical setup:
- Guitar
- Microphone
- Audio interface (with XLR inputs)
- Computer
- Monitoring headphones or speakers

Make sure all your cables are in good nick and properly connected. A loose connection can ruin a perfect take.
I always do a sound check before recording. This helps me check for latency and spot any issues in the chain before laying down tracks.
Guitar Setup
Setting up your guitar properly is key to capturing a great sound in your recordings
How different strings affect the sound
Old strings can give your recordings a warm, retro vibe that often works well in the digital domain.
They have a mellow, less bright sound which can be perfect for certain styles. However, be cautious, as they can also sound dull if they’re too worn out.
On the other hand, new strings offer a bright and crisp sound.
This can be great for clarity and presence in your recordings, but sometimes, they can sound brittle if not treated correctly in post-production.
Try adding a touch of EQ or compression to soften the harshness to smooth out the sound.
Maintenance and tuning
Keeping your guitar in top shape is crucial for a good recording.
- Regularly cleaning your strings and fretboard can extend the life of your strings and maintain a consistent sound.
- Always tune your guitar before each recording session to ensure every note rings true.
Is it worth getting your guitar set up by a luthier? Absolutely – if the budget allows.
A professional setup can make a world of difference. They can adjust the action and intonation and even suggest the best strings for your guitar and playing style. It’s a small investment with a big payoff in sound quality and playability.
Alternative Guitar Setup (Phoebe Bridgers Sound)
Recently, I have been inspired by Phoebe Bridgers and experimenting with some alternative setups.
- A rubber bridge can give your guitar a muted, percussive sound that’s quite distinct. It’s great for creating that sad, haunting vibe in your recordings.
- Using flat-wound strings can produce a smoother, more subdued, mellow tone than regular strings. They’re perfect for that laid-back, melancholic sound.
- A parlour guitar, with its smaller body, offers a focused, intimate sound that beautifully complements this style. It’s great for fingerpicking and softer strumming.
Recording techniques
Recording an acoustic guitar requires careful attention to microphone placement and setup. I’ll cover some key methods for capturing a rich, natural sound.
Microphone polar patterns
Microphone polar patterns describe how mics pick up sound from different directions, helping you capture the best audio for your recording needs.
- Cardioid mics are great for recording acoustic guitars. They focus on the sound source and cut out room reflections and background noise, giving you a clean, clear recording.
- Figure 8 mics pick up sound from the front and back while rejecting the sides. This is handy if you’re singing and playing at the same time. It can isolate your vocals while capturing the guitar sound, making it easy to get a clean mix.
- Omnidirectional mics should generally be avoided for recording acoustics, as they will pick up a 360-degree image, potentially creating too much ambience.
Experiment with these mic placements and polar patterns to find what works best for your recording setup.
This flexibility helps you capture the natural tone of your acoustic guitar and fit it perfectly into your overall mix.
Microphone techniques for natural sound
Proper mic placement is crucial for a good acoustic guitar recording. I like to start with a single mic about 30 cm from where the neck meets the body. This captures a balanced tone.
For fingerpicking, I move the mic closer to the bridge. This brings out more sparkle and definition. For strumming, I aim more towards the soundhole for added warmth.
The type of mic you use can make a difference.
- Cardioid mics work well to focus on the guitar and reduce room noise (pencil condensers are a good example for recording acoustic guitars). They pick up sound from the front and sides, but not the back.
- I use a large diaphragm condenser for a full, detailed sound.
- A ribbon mic can add vintage character.
Experiment with mic angle, too. Pointing directly at the guitar gives a brighter tone, while angling off-axis softens harsh frequencies.
- If I want the sound to be rich in lows and intimate, I’ll place the microphones close to the guitar (4-6 inches). This could work well for a finger-picking style where I want to portray closeness.
- If I want more treble and midrange from the guitar, I’ll place the microphone further away (6-10 inches). This could work well in a busy, complex mix with other instruments.
Before positioning the microphone, ask yourself, “Why am I placing the microphone here? “What does this sound need to do? “
Try different angles and distances. Small changes can make a big difference in the final sound.
Common mic placements
For the XY placement, position two cardioid mics at a 90-degree angle with their capsules close together.
- The mics should be about 12 inches from the guitar.
- Point one mic at the 12th fret and the other at the soundhole.
This gives you a focused stereo image with a clear centre, avoiding phase issues. It’s perfect for a balanced stereo sound without too much room reflection.
One thing to note with the XY setup is that you will need to balance your levels as the microphone pointing at the sound hole will be a couple of decibels louder.

In the AB setup, place two mics about 20-30 cm apart.
This technique captures a wider stereo image with more room ambience, creating a spacious, natural, and lively guitar sound.
ORTF placement mixes the best of XY and AB. Place two cardioid mics at a 110-degree angle, 17 cm apart.
This setup gives a realistic stereo image with good localisation and a natural sense of space, making it versatile for various recording situations.
Aim the mic at the 12th fret, about 15-30 cm away for a balanced tone. This sweet spot captures both the bright treble and warm bass tones.
You can get a natural, detailed sound that emphasises the body’s resonance and the string’s clarity.
A spaced pair can work too. I put one mic near the 12th fret and another by the bridge. This captures both brightness and body.
Recording in stereo for added depth
Stereo recording creates width and dimension but watch for phase issues. Always check in mono to ensure compatibility.
Initially, it will be easier to start using techniques that keep the microphone capsules close together, such as the XY method, discussed above.
By starting this way, you will ensure the stereo recording remains phase-accurate. Once comfortable with this, you can move on to more complex techniques, such as the spaced pair.
Dealing with phase issues
Phase problems occur when the same sound hits two mics at different times. This can cause a thin, hollow tone.
To avoid this:
- Use the 3:1 rule – space mics at least three times the distance from the source
- Check phase alignment visually in your DAW
- Use a phase meter plugin
- Trust your ears – if it sounds bad, adjust the mic positions
If issues persist, try flipping the polarity on one channel. This can often fix phase cancellation.
Capturing room ambience
Room sound adds life to acoustic guitar recordings. I like to blend close and room mics for depth.
Place a room mic 1-2 metres away. Experiment with height and angle. Avoid pointing directly at the guitar to reduce direct sound.
Generally speaking, placing the microphone closer to the floor will produce lower frequencies, whereas placing it higher will produce higher, more trebly frequencies.
Condenser mics with omnidirectional patterns work well for room sound. They pick up a natural, open ambiance.
Blend to taste. Too much room can make the guitar sound distant, and not enough can leave it dry and lifeless.
Try hanging blankets or using acoustic panels to tame reflections in untreated rooms. This helps create a cleaner room sound.
Placement based on the part’s role
If the guitar is a prominent feature in your track, using a wide stereo pair (such as the AB or ORTF setups) can help it dominate the mix. This approach captures the instrument’s full range and spatial characteristics, making it stand out.
A single microphone is enough for guitars playing a minor role. Placing a cardioid mic at the 12th fret or using a single close mic technique ensures the guitar complements the mix without overwhelming other elements.
Direct sound vs. room sound
Balancing direct and room sound is crucial for a natural yet controlled recording.
- Close miking (such as the 12th fret technique) emphasises the guitar’s direct sound, providing clarity and detail.
- Consider adding a room mic placed 1-2 metres (3-6 feet) away to capture more room ambience, blending it with the close mic to taste.
Performing and tracking
When recording acoustic guitar at home, how you play and track your performance is crucial. It affects the sound quality and overall vibe of your recording.
Bringing out the best guitar sound
To get a great acoustic guitar sound, I focus on these elements:
- Proper tuning before each take
- Correct finger placement on the fretboard
- Consistent pick or fingerpicking technique
I also pay attention to playing dynamics. This means varying the force I use when strumming or picking. It adds life to the recording.
For the best tone, I experiment with different playing positions. Sometimes, I sit, and other times, I stand. Playing closer to the neck provides a warmer sound while moving towards the bridge gives a brighter tone.
Lastly, I make sure the guitar is in good condition. Fresh strings and a recent setup can make a world of difference.

Maintaining consistency in rhythm guitar
Keeping a steady rhythm is key for a professional-sounding recording. Here’s what I do:
- Use a metronome to stay on beat
- Practice the part thoroughly before recording
- Break complex parts into smaller sections
I often record multiple takes of rhythm parts. This allows me to choose the best one or layer them for a fuller sound.
For strumming patterns, I start simple and then add complexity as I get more comfortable. This helps maintain a consistent groove throughout the song.
Avoiding common playing errors
When tracking, I watch out for these common mistakes:
- Fret buzz: Press firmly on the strings to avoid unwanted noise
- String squeaks: Lift your fingers cleanly when changing chords
- Inconsistent volume: Aim for an even pressure when strumming
- Moving around: Try and stay in one position so the mic can capture sound evenly
I also pay close attention to intonation. This means ensuring each note is in tune, especially when playing up the neck. Check if your strings produce the same note when played open and at the 12th fret. If they are drastically out, you may need to have your guitar adjusted.
To catch these errors, I listen back to each take with headphones. If I hear any issues, I re-record that section. It’s better to get it right during tracking than try to fix it later.
Post-production and mixing
After recording your acoustic guitar, it’s time to shape the sound. The mixing stage is where I combine all the recorded elements. It’s a crucial step in creating a polished, professional-sounding acoustic guitar recording.
I’ll walk you through cleaning up tracks, enhancing dynamics, applying EQ and effects, while blending the guitar with other instruments.
Cleaning up your acoustic guitar tracks
I start by removing unwanted noise. This includes:
- Background hums
- String squeaks
- Fret buzz
- Add in high pass filter to remove low-end rumble
I use noise reduction plugins to tackle constant background noise. For specific sounds, I’ll use audio editing software to cut them out.
Next, I trim silence at the start and end of the tracks, creating a clean beginning and end.
I also check for timing issues. If needed, I’ll nudge notes to align with the rhythm. But I’m careful not to overdo it. I want to keep the natural feel of the performance.
That said, sometimes, the little imperfections can add authenticity to the song. Try not to get too hung up on the technicalities, the main focus should be on the overall vibe.
Balancing tracks and EQ techniques
I start by setting the levels of each track. This creates a good foundation for the mix. I use the faders to adjust the volume of each element.
My goal is to make sure the acoustic guitar sits well with any other instruments or vocals.
Now it’s time to shape the sound.
I use EQ to balance frequencies and help the guitar sit well in the mix without competing with other instruments.
- For example, I might cut some low-end from the guitar if it’s competing with the bass. This is easily achieved by adding a high pass filter around 100hz
- I might boost around 100 Hz for more body, and again at 750 – 950 Hz to reduce honkiness.
- A slight boost at 2-4 kHz can add presence to the strumming.
- Additionally, adding a boost at 7-12 kHz can add some shine.
I’m careful not to overdo it, though. Subtle changes often work best.
Adding effects and processing
Now it’s time to add some flavour. I usually start with compression. This evens out the guitar’s dynamics and adds sustain.
I use gentle compression settings to even out the volume. This helps the guitar sound more consistent. A ratio of 2:1 or 3:1 often works well. I usually set the attack to be fairly quick and set the release time to be slow.
Reverb is another key effect for acoustic guitar. It adds depth and space to the sound. I prefer a short room or plate reverb. Too much can make the guitar sound distant. I keep the wet/dry mix low to maintain clarity.
Other effects I might use include:
- Delay for a subtle widening effect
- Chorus for a shimmer on strummed parts
- Saturation for extra warmth
I always listen in context and adjust as needed. The goal is to enhance the guitar without overwhelming it.
Integration with other instruments
In this final stage, I ensure the acoustic guitar fits well with other elements.
I use panning to give each instrument its own space in the stereo field. The guitar often works well slightly off-centre.
I also pay close attention to how the guitar interacts with the vocals. If they’re competing, I might use sidechain compression. This ducks the guitar slightly when the vocals come in.
For busy mixes, I sometimes use multiband compression. This lets me control specific frequency ranges without affecting the whole sound, which is great for taming resonances or harsh frequencies.
Lastly, I automate volume and effects to add movement and interest to the mix. For example, I might raise the guitar’s volume for a solo or increase the reverb for the outro.
Software and plugins
Recording at home requires the right software and plugins. These tools can greatly improve (or sabotage) the quality of your recordings.
Digital audio workstations (DAWS)
There are several great DAWs for recording software:
- Pro Tools: Ideal for those aiming for industry-standard quality. It’s great for recording and editing vocals and instruments with precision, although its learning curve might be steeper for beginners.
- Logic Pro: A great pick for Mac users. It’s powerful, intuitive, and comes with excellent built-in virtual instruments and effects, perfect for crafting full arrangements.
- GarageBand: A free and beginner-friendly option for Mac users. It’s perfect for quick demos and simple multi-track recordings, with an easy upgrade path to Logic Pro.
- Reaper: Affordable and highly customizable, making it a great choice for singer-songwriters who want flexibility without breaking the bank. It’s lightweight and works seamlessly on both Mac and PC.
- Ableton: Best for musicians incorporating electronic elements into their demos. Its loop-based workflow is great for building tracks and experimenting with arrangements.
- Cubase: A strong choice for those focused on MIDI and virtual instrument-based songwriting. Its intuitive tools make it easy to layer and edit instrument tracks.
- Nuendo: While more tailored for audio post-production, it’s a good option for singer-songwriters experimenting with multimedia projects or scoring.
I recommend trying a few different options to see what feels most comfortable. Most offer free trials, so you can test them out.
When choosing recording software, consider the following:
- Ease of use
- Available plugins and virtual instruments
- Price and upgrade options
- Compatibility with your computer
Plugins
Plugins can enhance your acoustic guitar recordings in many ways:
- EQ plugins: Shape the tone of your guitar
- Compression: Even out the volume and add sustain
- Reverb: Add space and depth to your sound
- De-esser: Tame harsh high frequencies
I love using a gentle EQ to bring out the best in my acoustic. However, I usually employ EQ to remove harsh, unflattering frequencies rather than boosting.
A touch of compression can also help your guitar sit well in a mix.
Experiment with different plugin combinations. But don’t overdo it! Sometimes less is more when recording acoustic guitar.
Finalising the master
The final stage is mastering, where I polish the overall sound. I start by balancing the levels between different tracks.
I use a limiter to control peaks and boost the overall volume. But I’m careful to leave some dynamic range. I don’t want the guitar to sound squashed.
I check the stereo width. If needed, I might use a stereo widener for a broader sound. But I make sure it still sounds good in mono.
Lastly, I compare my master to reference tracks. This helps me ensure the sound quality matches professional recordings.
Common mistakes and how to avoid them
Recording acoustic guitar at home can be tricky, but knowing the common pitfalls and how to avoid them can make a huge difference.
Here’s a handy table to help troubleshoot and find solutions to common recording issues.
| Issue | Why It’s a Problem | Solution |
| Poor Room Acoustics | Uncontrolled room reflections and resonances can colour the sound, making it muddy or harsh. | Invest in basic acoustic treatment like bass traps, diffusers, and absorption panels. Use carpets and curtains to dampen reflections. |
| Not Having the Guitar Set Up Correctly | The guitar doesn’t feel right, and it goes out of tune the further you go up the neck. | Invest in having your guitar professionally set up to ensure it feels right and stays in tune. |
| Improper Microphone Placement | Incorrect mic positioning can result in a thin or boomy sound. | Experiment with different placements (e.g., 12th fret, soundhole) and distances. Use common techniques like XY, AB, or ORTF. |
| Ignoring Gain Staging | Setting input levels too high or too low can cause distortion or noise. | Aim for levels that peak around -6dB to -12dB to avoid clipping and maintain headroom. |
| Using the Wrong Microphone | Choosing a mic that doesn’t suit the instrument or room can affect sound quality. | Use condenser mics for detail and dynamic mics for robustness. Match the mic to the guitar’s tonal qualities and the recording environment. |
| Poor Monitoring Environment | Using inadequate headphones or monitors can lead to poor mixing decisions. | Invest in good quality headphones and monitors. Ensure your monitoring environment is treated to provide an accurate representation of your mix. |
| Not Double-Tracking | Single guitar tracks can sound flat and lack depth. | Record multiple takes and layer them to create a fuller, richer sound. |
| Overuse of Effects | Excessive use of reverb, delay, and other effects can muddy the mix. | Use effects sparingly and purposefully. Focus on achieving a clean recording first. |
| Using Too Many Tracks | Song sounds muddy and too busy/messy. | Concentrate on getting a good initial sound. Have a mantra of less is more. |
| Neglecting DI Recording | Relying solely on mic recordings can limit flexibility. | Record a DI track along with mic recordings to give more options during mixing. |
| Not Using a Pop Filter | Plosive sounds can cause unwanted noise in the recording. | Use a pop filter to reduce plosives and protect the microphone. |
| Skipping the Editing Process | Raw recordings often have unwanted noise and imperfections. | Edit recordings to remove noise, tighten timing, and comp the best parts of multiple takes. |
| Not Approaching Recording with the Right Mindset | Your mind is clouded by the tasks of the day, work problems, relationship issues. | Take time to clear your head, meditate, or turn off distractions to focus on the music. |
| Lack of Reference Tracks | Mixing without a reference can lead to an unbalanced mix. | Use professionally mixed tracks as references to guide your mixing decisions. |
| Ignoring Phase Issues | Multiple mics can cause phase cancellation, leading to a thin sound. | Check phase relationships between mics by flipping the phase on one channel and listening for changes. |
| Forgetting to Tune the Guitar | Out-of-tune guitars can ruin an otherwise great recording. | Regularly check and tune your guitar before and during recording sessions. |
| Not Backing Up Recordings | Losing recordings due to hardware failure can be devastating. | Regularly back up your work to multiple locations, such as external hard drives and cloud storage. |
By proactively addressing these common mistakes, you can ensure that your recordings are of the highest quality and true to your vision.

Next steps to creating outstanding acoustic demos
Recording acoustic guitar at home can be a rewarding experience, but it requires attention to detail and careful setup.
Here’s the key steps to high-quality recordings:
- Choose the right guitar: Select one that suits your style and recording needs. Consider size, type, and setup.
- Prepare your recording space: Invest in basic acoustic treatment to control room reflections and resonance.
- Select and position your microphone: Experiment with different mic placements and techniques, such as XY, AB, and ORTF. Position the mic at the 12th fret for a balanced sound.
- Maintain proper gain staging: Set input levels to avoid distortion and maintain headroom.
- Choose the right microphone: Use condenser mics for detail and dynamic mics for robustness, matching them to the guitar and room.
- Ensure a good monitoring environment: Use quality headphones and monitors in a treated room to make accurate mixing decisions.
- Double-track for depth: Record multiple takes and layer them for a richer sound.
- Use effects sparingly: Focus on a clean recording and add effects purposefully.
- Edit and refine: Remove unwanted noise, tighten timing, and comp the best parts from multiple takes.
- Regularly tune and back up: Keep your guitar tuned and back up your recordings to avoid losing your work.
You can achieve professional-sounding recordings from your home studio by following these steps.
For further guidance, check out these additional resources
These guides will help you enhance your recording setup and refine your production skills, ensuring your demos sound great. Happy recording!
