


Table of Contents
Getting vocals to stand out in a mix seems easy until you actually try it. The secret to making them cut through without sounding harsh comes down to knowing which frequencies to boost, which to cut, and how much space to give everything else.
Audio equalisation isn’t about transforming your voice into something else. It’s more like adjusting the lighting in a room: you’re not moving the furniture, just making it easier to see what’s already there.
This guide walks through the principles that actually matter and the step-by-step process I use on every vocal track.

Understanding vocal frequencies
The human voice spans roughly 80 Hz to 12 kHz, but not all of it matters equally.
Your fundamental pitch sits between 80–300 Hz, depending on vocal range. Bass singers have fundamental frequencies around 80–150 Hz, whilst sopranos land higher at 250–300 Hz. These fundamentals carry warmth and body.
Below 80 Hz, you mostly get rumble from poor room acoustics. I always high-pass filter here, instantly cleaning things up without touching the actual vocal sound.
The 200–500 Hz range is where resonant frequencies accumulate, especially in home recordings without a proper vocal booth. Too much here and things get boxy. Too little and vocals feel thin.
Between 2–5 kHz sits the presence zone, where consonants live and lyrics become intelligible. If vocals need to cut through, I start here. Even a small boost can move them from buried to brilliant.
Above 8 kHz lies the air band. A gentle high shelf EQ here adds polish and that expensive sheen, but push too far and it gets harsh fast.
| Frequency range | What it contains | Common action |
|---|---|---|
| Below 80 Hz | Rumble, noise | Cut with high-pass filter |
| 80–300 Hz | Fundamental frequencies, warmth | Protect but clean up if needed |
| 200–500 Hz | Body, resonance | Gentle cut for clarity |
| 1–1.5 kHz | Nasal resonance | Cut if vocals sound honky |
| 2–5 kHz | Presence, intelligibility | Boost to help vocals cut through |
| 8–12 kHz | Air band, sparkle | Gentle high shelf EQ for sheen |
Why subtractive EQ comes first
I used to boost everything with my equalizer plugin. More presence, more air, more body. My mixes always ended up cluttered and weird.
Subtractive EQ means cutting problem frequencies instead of boosting the good stuff. It keeps your mix cleaner and more natural. Any experienced audio engineer will tell you: cut before you boost.
Here’s my sweep technique using a parametric EQ like FabFilter Pro-Q: create one of the bell curves with a Q value around 5.0, boost by 10 dB, then slowly sweep through the frequency spectrum. When you hit a honky, harsh, or boxy frequency, flip that boost into a 2–4 dB cut. The spectrum analyser shows exactly where problems live.
Cut first, boost second. This keeps your frequency adjustments transparent and effective.
Vocal EQ cheat sheet

Remove low-end rumble
Start with a high-pass filter around 80 Hz for male vocals, pushing up to 100 Hz for female vocals. Sweep the filter up until the voice starts sounding thin, then back off slightly. That’s the sweet spot.
I typically use a slope of 12 dB or 18 dB per octave in my equalizer plugin, steep enough to remove rumble without creating phase issues that muddy the lower midrange.
This cut removes room rumble, microphone handling noise, and low-frequency thumps from plosives.
Control muddy frequencies
If vocals sound wrapped in a blanket, blame the 200–500 Hz range. This is where room acoustics without proper treatment create resonant frequencies that cloud your audio signals.
Use the boost and sweep trick: make a narrow 3 dB boost with a Q filter around 5.0, sweep through while the vocal plays, and when it sounds boxy, flip that boost into a 2–4 dB cut.
For most vocals, the worst buildup sits around 250–350 Hz.
Fix nasal tone
This is something I wish someone had told me years earlier. Nasal resonance lives around 1–1.5 kHz and makes vocals sound honky and unpleasant. If your vocal sounds like a nasally voice coming through someone’s nose, check this range.
Use the same sweep technique: boost a narrow EQ band by 6 dB, sweep between 1–1.5 kHz, and when it sounds painfully nasal, cut by 2–4 dB at that frequency.
This adjustment alone can transform amateur-sounding vocals into something genuinely professional.
Enhance presence
Once you’ve cleaned up problems, help the vocal cut through. The upper mids (3–5 kHz) are where words get clear and understandable.
Boost around 3.5 kHz by 2–3 dB with a medium-width bell curve (Q around 2.0). This brings out consonants and helps lyrics pop. For female vocals, shift this up to 4–5 kHz for a smoother feel.
Always make vocal EQ adjustments whilst listening to the full mix, not the solo voice. What sounds awesome alone can turn harsh when instruments return.
Add air
That professional sheen you hear on big records is usually subtle high-frequency enhancement above 10 kHz.
Use a high shelf EQ starting at 10–12 kHz and boost by 1–3 dB. This adds sparkle and openness.
But if you’re working with a budget mic, this boost might make things worse. Low-pass filters around 16–18 kHz can tame excessive brightness without dulling the vocal. Always compare with and without.
Advanced techniques
Dynamic EQ for problem frequencies
Unlike regular parametric EQ that always works, dynamic EQ only kicks in when certain frequencies get too loud. It’s like having a smart assistant that steps in only when needed.
Find the problem frequency, set the threshold so it only triggers on loud passages, and apply a gentle 2–4 dB cut when it activates. Your vocal stays natural during quiet parts; when the singer belts it, the EQ tames those frequencies automatically.
Taming sibilance
Those harsh ‘s’ and ‘t’ sounds usually sit between 5–8 kHz. A de-esser is basically a frequency-specific compressor that listens for sibilant sounds and turns them down fast.
Start gentle. Too much de-essing makes vocals sound lispy. Set the threshold to catch only the loudest sibilance, aiming for 3–6 dB of reduction maximum. For female vocals, target around 6–8 kHz; male vocals often need attention closer to 5–7 kHz.
Managing the proximity effect
Get too close to a directional mic and the low end booms out. Bass below 200 Hz can get out of control when you’re closer than about 15 centimetres.
If you’ve already tracked the vocal, a high-pass filter starting around 100–150 Hz usually sorts it. Sometimes a low shelf cut around 200–300 Hz helps too.
EQ differences across vocal ranges
| EQ adjustment | Male vocals (bass to tenor) | Female vocals (alto to soprano) | Why it differs |
|---|---|---|---|
| Fundamental frequencies | 80–250 Hz | 150–350 Hz | Female voices have higher fundamental pitch |
| High-pass filter setting | 80–100 Hz | 100–120 Hz | Can filter higher without losing body on female vocals |
| Problem frequency | 200–400 Hz (muddiness) | 300–500 Hz (honkiness) | Resonances occur at different frequencies |
| Presence boost | 3–4 kHz | 4–5 kHz | Female consonants sit slightly higher in spectrum |
| De-essing target | 5–7 kHz | 6–8 kHz | Sibilance occurs at higher frequencies in female voices |
Both formats work well. The first is more concise and scannable, whilst the second includes educational context about why the settings differ. Choose based on whether you want pure reference (first table) or educational value (second table).
Genre-specific starting points
- Pop and R&B: Focus on clarity and polish. Boost presence around 4–5 kHz, add generous air at 10 kHz.
- Rock and metal: Cut more aggressively in the mids (200–500 Hz) to create space for guitars. Boost presence peaks at 3–4 kHz.
- Folk and acoustic: Keep it natural. Minimal EQ, just clean up with a high-pass filter and gently tame any nasal resonance.
- Hip-hop and rap: Emphasise fundamental frequencies around 150–200 Hz for weight. Boost 3–5 kHz for intelligibility.
Signal chain order
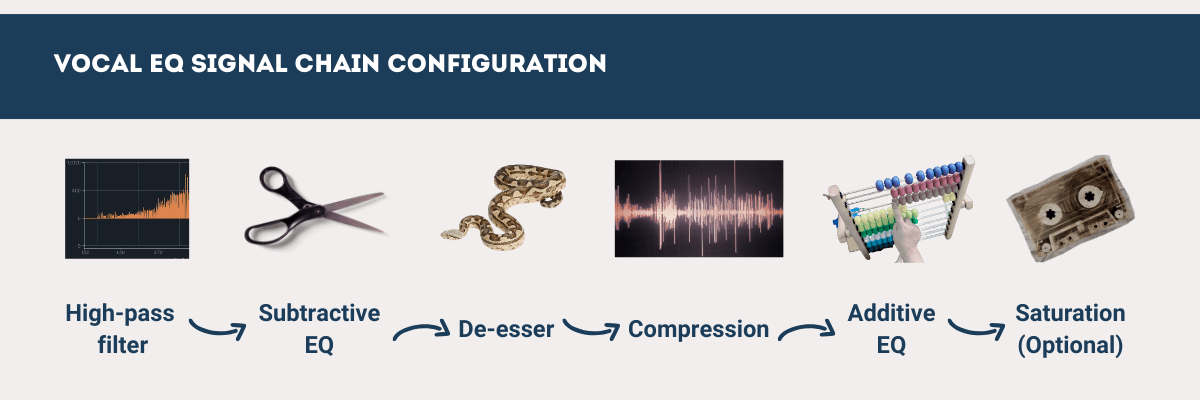
Where you place vocal EQ in your chain matters. EQ before vocal compression lets the compressor respond to a cleaned-up signal.
My typical vocal chain: high-pass filter → subtractive EQ → de-esser → vocal compression → additive EQ → optional tape saturation plugin.
Final thoughts
Good vocal EQ is invisible. When it’s working, listeners don’t notice the technical stuff. They just hear a clear, present vocal that serves the song.
The fundamentals haven’t changed: remove what you don’t need with subtractive cuts, then gently enhance what works with small boosts. Trust your ears more than any frequency chart. Every voice is different, every mic adds its own colour, and every room contributes something to the sound.
Most vocals sound better with less EQ than you think. The goal isn’t perfection in isolation. It’s making vocals work brilliantly in the context of your full mix.
